In my earlier post How to fix SharedArrayBuffer is not defined error I showed how I fixed the SharedArrayBuffer not defined error on my web app. I did it by adding the COOP and COEP headers to that page. That is making my page ‘Cross Origin Isolated’. That error was coming for one of my React based webapp. That fix was done at the Nginx web server level because I had dockerized that React app and hosted seperately. In this blog post, I will show how to do it at website level such as WordPress hosted website.
What is SharedArrayBuffer ?
SharedArrayBuffer is an array object in JavaScript. It can hold raw bytes and the memory contents can be shared between multiple threads. There is another array object called ArrayBuffer in JavaScript, which can be used to read and write raw byte data but it doesn’t allow shared access. In multi threaded functionality, SharedArrayBuffer are more efficient option.
Why SharedBufferArray not defined error ?
With some googling, I found this – With the discovery of meltdown attack spectre, many browsers including Firefox have disabled ‘sharedArrayBuffer’ and few other powerful browser functionalities. While Chrome allows using it for now but starting the Chrome 92 version, it will disable it as well. And to enable it in the browser, we have to make our website ‘Cross-Origin-Isolation‘.
How to enable SharedArrayBuffer on website?
To enable SharedArrayBuffer, the requirement is to make your website ‘CrossOriginIsolated’. This can be done by adding following two security headers to the top level document of your website:
Cross-Origin-Opener-Policy: same-originCross-Origin-Embedder-Policy: require-corp
I had to add those two headers to the Nginx configuration file, as shown in my old post. If you have React based app or you have hosted your webapp or website behind Nginx web server, then you can follow that post.
If you have WordPress website and want to enable SharedArrayBuffer or basically make your website ‘CrossOriginIsolated’ then you can follow this approach.
How to enable Cross Origin Isolation on the WordPress website (Apache webserver) ?
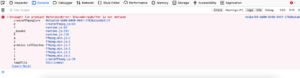
You need to access the .htaccess file in order to add the ‘Cross-Origin-Opener-Policy‘ and ‘Cross-Origin-Embedder-Policy‘ security headers.
<IfModule mod_headers.c>
Header set Cross-Origin-Embedder-Policy "require-corp"
Header set Cross-Origin-Opener-Policy "same-origin"
</IfModule>
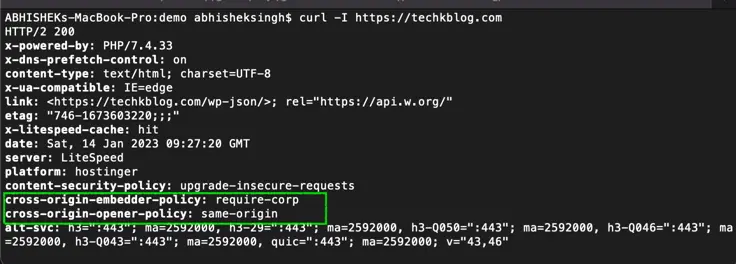
Now, if you added it properly then on doing curl to your website, you should see something like this and your website will be ‘CrossOriginIsolated’
Word of caution
Caution: Enabling cross-origin isolation will block the loading of cross-origin resources, and it will prevent your top-level document from being able to communicate with popup windows. So do test your website functionality after adding it.