In my previous blog post, I talked about the initial version of my implementation of Hand posture detection using OpenCV & CNN. And in this blog, I am doing a deep dive into the implementation and what I did to improve the performance and accuracy. After going through this post, you will understand how simple it is to implement a fast and yet functional posture detection system.
Just to clarify, I have used posture and gesture interchangeably in this blog. Although there is a difference between the word posture and gesture. A gesture is a state of action or movement, while Posture is a static state. And by posture detection, I mean hand posture detection.
As in the earlier version of the project, posture detection was not accurate enough. Therefore, I did some modifications to the project. Here are some of the changes that I did in CNNGestureRecognizer ver 2.0 :
- Firstly, increased the training image samples to 4015 images.
- Secondly, added more variety in training sample images like images taken at different lighting conditions, background, different filters.
- Thirdly, added an additional classification class ‘Nothing’ to properly ignore inputs without any valid gestures.
- Finally, trained for more cycles/epochs.
As a result, this ver 2.0 has much-improved posture prediction ability.
Pre-trained posture detection:
In this project, I have trained the CNN model to recognise up to 5 pre-trained hand postures:
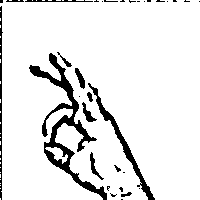
- OK
- PEACE
- STOP
- PUNCH
- NOTHING (ie when none of the above postures are input)
Functionality:
And it provides following functionalities:
- Prediction: This allows the app to guess the user’s posture against pre-trained postures/gestures. The app can dump the prediction data to the console terminal or to a JSON file directly which can be used to plot a real-time prediction bar chart (you can use my other script — LivePlot ).
- New Training: This allows the user to retrain the Neural Network model. Users can change the model architecture or add/remove a new posture. This app has inbuilt options to allow the user to create new image samples of user-defined postures/gestures if required.
- Visualization: This allows the user to see feature maps of different Neural Network layers for a given input gesture image. Interesting to see how Neural Network works and learns things.
Posture Input processing:
I am using OpenCV for capturing the user’s hand gestures, through the inbuilt webcam. In order to simplify things, I am doing post-processing on the captured images to highlight the contours & edges. For instance, applying the binary threshold, blurring, gray scaling, etc.
In this app, I have provided two modes of capturing the user’s input hand postures:
- Binary Mode: In here I first convert the image to grayscale, then apply a gaussian blur effect with an adaptive threshold filter. This mode is useful when you have an empty background like a wall, whiteboard, etc.
- SkinMask Mode: In this mode, I first convert the input image to HSV and put a range on the HSV values based on skin color range. Then apply erosion followed by dilation. Then added, Gaussian blur to smoothen out the noises. Using this output as a mask on original input to mask out everything other than skin-colored things. Finally, I have grayscaled it. This mode is useful when there is a good amount of light and you don’t have an empty background.
Binary Mode captured posture output:
gray = cv2.cvtColor(roi, cv2.COLOR_BGR2GRAY)
blur = cv2.GaussianBlur(gray,(5,5),2)
th3 = cv2.adaptiveThreshold(blur,255,cv2.ADAPTIVE_THRESH_GAUSSIAN_C,cv2.THRESH_BINARY_INV,11,2)
ret, res = cv2.threshold(th3, minValue, 255, cv2.THRESH_BINARY_INV+cv2.THRESH_OTSU)
SkinMask Mode captured posture output:

hsv = cv2.cvtColor(roi, cv2.COLOR_BGR2HSV)

#Apply skin color range
mask = cv2.inRange(hsv, low_range, upper_range)
mask = cv2.erode(mask, skinkernel, iterations = 1)
mask = cv2.dilate(mask, skinkernel, iterations = 1)

#blur
mask = cv2.GaussianBlur(mask, (15,15), 1)

#bitwise and mask original frame
res = cv2.bitwise_and(roi, roi, mask = mask)

# color to grayscale
res = cv2.cvtColor(res, cv2.COLOR_BGR2GRAY)
CNN Model used:
The Convolutional Neural Network model I have used for this project is pretty basic model:
model = Sequential()
model.add(Conv2D(nb_filters, (nb_conv, nb_conv),
padding=’valid’,
input_shape=(img_channels, img_rows, img_cols)))
convout1 = Activation(‘relu’)
model.add(convout1)
model.add(Conv2D(nb_filters, (nb_conv, nb_conv)))
convout2 = Activation(‘relu’)
model.add(convout2)
model.add(MaxPooling2D(pool_size=(nb_pool, nb_pool)))
model.add(Dropout(0.5))
model.add(Flatten())
model.add(Dense(128))
model.add(Activation(‘relu’))
model.add(Dropout(0.5))
model.add(Dense(nb_classes))
model.add(Activation(‘softmax’))
This model has the following 12 layers –
_________________________________________________________________
Layer (type) Output Shape Param #
=================================================================
conv2d_1 (Conv2D) (None, 32, 198, 198) 320
_________________________________________________________________
activation_1 (Activation) (None, 32, 198, 198) 0
_________________________________________________________________
conv2d_2 (Conv2D) (None, 32, 196, 196) 9248
_________________________________________________________________
activation_2 (Activation) (None, 32, 196, 196) 0
_________________________________________________________________
max_pooling2d_1 (MaxPooling2 (None, 32, 98, 98) 0
_________________________________________________________________
dropout_1 (Dropout) (None, 32, 98, 98) 0
_________________________________________________________________
flatten_1 (Flatten) (None, 307328) 0
_________________________________________________________________
dense_1 (Dense) (None, 128) 39338112
_________________________________________________________________
activation_3 (Activation) (None, 128) 0
_________________________________________________________________
dropout_2 (Dropout) (None, 128) 0
_________________________________________________________________
dense_2 (Dense) (None, 5) 645
_________________________________________________________________
activation_4 (Activation) (None, 5) 0
=================================================================
Total params: 39,348,325.0 Trainable params: 39,348,325.0
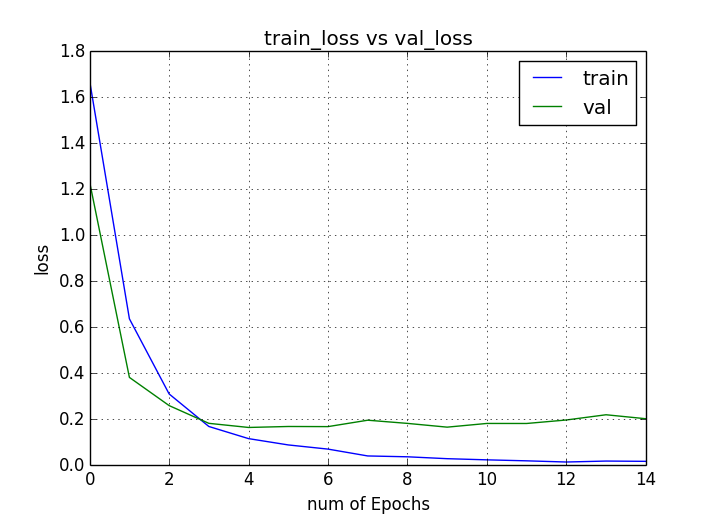
Training
While, in version 1.0 of this project, I had used 1204 images only for training. Predictions probability was ok but not satisfying. So in version 2.0, I increased the training image set to 4015 images in other words, 803 image samples per class. Also added an additional class ‘Nothing’ along with the previous 4 hand posture classes.
I have trained the model for 15 epochs.

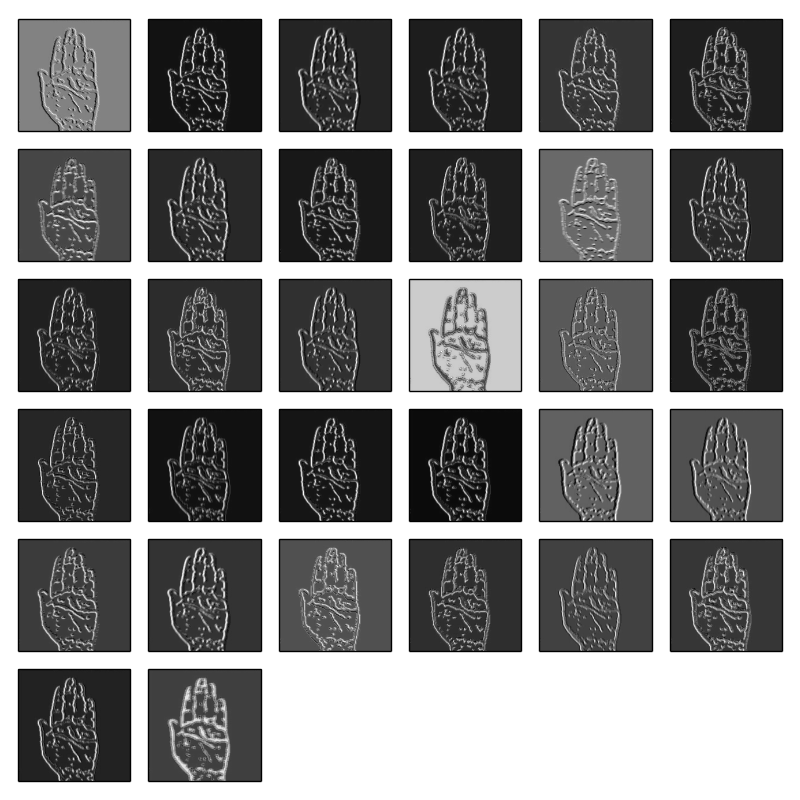
Visualization
Certainly, CNN is good at detecting edges and that’s why it’s useful for image classification kind of tasks. In order to understand how the neural net is understanding the different gesture inputs, it’s possible to visualize the layer feature map contents.
After launching the main script choose option 3 for visualizing different or all layer for a given image
layer = model.layers[layerIndex]
get_activations = K.function([model.layers[0].input, K.learning_phase()], [layer.output,])
activations = get_activations([input_image, 0])[0]
output_image = activations
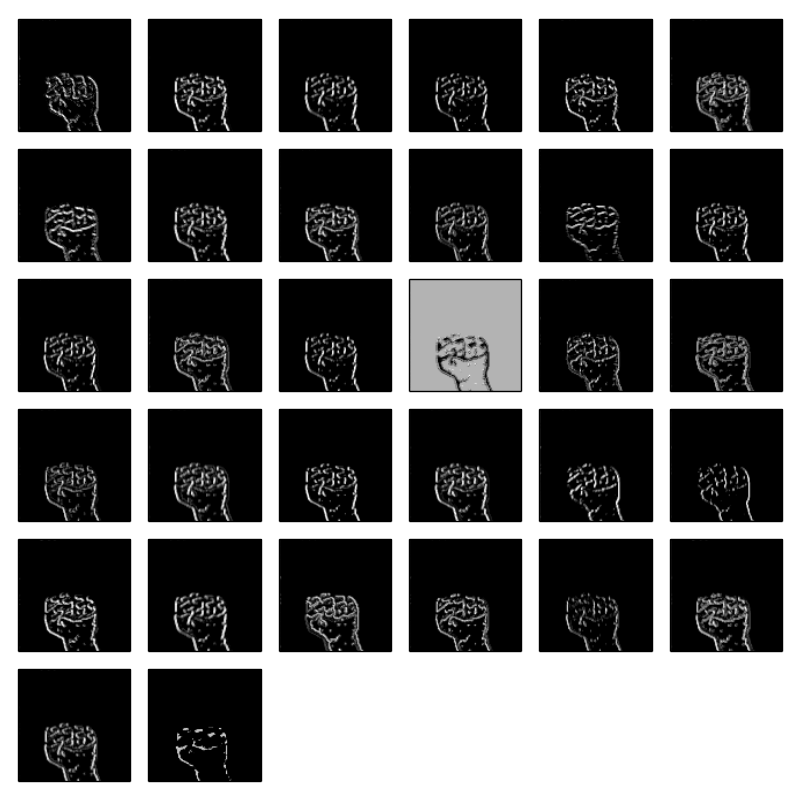
For example, Layer 4 visualization for PUNCH gesture
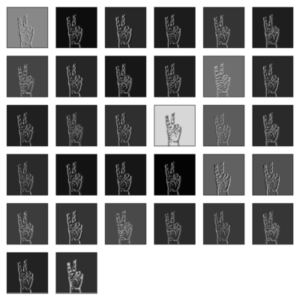
Another example, Layer 2 visualization for STOP gesture
Source Code:
The updated source code will be available at –
What about performance ?
Subsequently, I thought of testing out the responsiveness of predictions and games are good benchmarks. On Mac, I don’t have any games installed but then this Chrome Browser’s Dino game came in handy. So I bound the ‘Punch’ gesture with the jump action of the Dino character. Basically can work with any other gesture but felt the Punch gesture is easy. The ‘Stop’ gesture was another option.
Well here is how it turned out

More about this project in my next blog post. So please stay tuned.
As a conventional programmer, I do feel that the neural network-based machine learning approach is an interesting way to solve problems, but it comes with its own challenges. For instance, debugging model’s inaccurate predictions and performance of the trained model are some of the few such challenges. But with enough experience in the field, it should get better only. I want to expand my knowledge further ( if time permits ), in machine learning.
I want to do more practical implementations of other neural network types, for example, GAN, RNN, transfer learning technique, and my favorite Reinforcement Learning to train NPC in-game projects.
In conclusion, if you find this blog interesting enough then please do comment, like or share it across. This will help me keep motivated.
Take care !